
Authorization system with Owin, Web Api,
Json Web Tokens
Intent
What we want to accomplish here is to create a reusable authentication system using Json Web Tokens ( Jwt ), Owin and Web Api.

Let’s start by clearly specifying the deliverables.
1. an Authorization Server ( AS ). It will only have one job, to verify the client trying to access it and if successful, generate a Jwt which can be used for a configurable duration to access the Resource Server.
2. a Resource Server ( RS ). This is where all the work will happen. All the calls to this server need to be signed with the Jwt generated by AS. Everything else will receive a Not Authorized error
3. Everything will be backed up by a generic Membership system. The membership system used is the old one before the introduction of the Identity Model.
The reason for this choice is that it’s simple, it works, it’s light and it doesn’t have any additional dependencies, while Identity Model by default needs Entity Framework to run. While it is possible to run the Identity Model without Entity Framework that is a subject for another article. If you do however need the Identity Model feel free to replace the current Membership system with the one you actually require.
4. a way to build all these components as NuGet packages
5. a NuGet server project – this one will be responsible for building a private NuGet feed where we can deploy NuGet packages for both AS and RS. We want to be able to create a new project, add a NuGet package, change the web.config and have a running AS or RS.
6. We want to automate this process as much as possible.
7. All the code is publicly available on github
8. You can use my own NuGet feed but I cannot guarantee it will be up all the time. For now anyway, you’re welcome to use it : http://andrei-owin-nuget.azurewebsites.net/nuget
Reviewers
I asked a number of technical people I respect for feedback on this article and their contribution is acknowledged here :
- Taiseer Joudeh ( Microsoft MVP ) – blog
- David Paul McQuiggin ( Founder of Pro-Coded )
Credits
This article is based on the work done by Taiseer Joudeh in this great article.
I strongly encourage you to start by reading Taiseer’s article first, it will lay out the ground work for what we are about to do next.
Ok, so with that in mind let’s begin.
1. The Authorization Server
Description
We will need a database where we will store only one thing – the Audience details.
An Audience is simply a client who wants to access the AS and for that we need a few things :
- Client Id – Guid
- a descriptive name
- a Client Secret
- an Issuer ( this can be a site url for example and will be used to sign the Jwt generated)
Let’s talk a bit about this part. The most important bit here is the Client Secret which is a Base64 encoded string.
One of the packages we use to generate the Jwt is Thinktecture.IdentityModel.Core
We’re using the classes from this package in our CustomJwtFormat class specifically when we generate the Signing Key for the Jwt.

Look at lines 44 and 45. We get a byte array from our Client Secret and use it to create the signing credentials. The HmacSigningCredentials constructor takes a byte array and that byte array needs to have a very specific size : 32, 48 or 64 otherwise it will throw an Unsupported key length error. You can see this if you look at the code which can be seen on github at this link.
So, in order to have a valid Client Secret we need to generate a Base64 encoded string which transforms into a byte array of one of the require lengths. To do this I had to dig through the Base64 documentation on wiki. This article tells us that each byte uses approximately 4/3 characters. For 32 bytes we need to generate a 43 characters of Base64 encoded string. Now, a Base64 encoded string needs to have a length which is divisible by 4 so we need to pad it with an equal sign (=) which is the Base64 accepted placeholder for no data.
In order to generate this 44 character Base64 encoded string we need to start with a 32 character input string. This is of course very handy and now you perhaps realize why I chose 32 to begin with. This is basically the length of a GUID without dashes (36 – 4 = 32).
So, after all this Base64 craziness, all we need really is for our Client Secret to be a Guid without dashes. This way you can generate as many Client Secrets as you like and they will all be accepted by the system. You can use online services to generate them or generate your own with Guid.NewGuid().ToString(“N”). This will take out the dashes so you end up with your desired 32 chars long string.
The time has come to create our AS database. It only needs one table with four fields and the script can be seen in the Scripts folder.
Once you setup the AS Database it is time to move on to the code part.
Create an empty Web Project and add the following NuGet packages
- Microsoft.AspNet.Cors
- Microsoft.AspNet.WebApi.Client
- Microsoft.AspNet.WebApi.Core
- Microsoft.AspNet.WebApi.Owin
- Microsoft.Owin
- Microsoft.Owin.Cors
- Microsoft.Owin.Host.SystemWeb
- Microsoft.Owin.Security
- Microsoft.Owin.Security.OAuth
- Newtonsoft.Json
- Owin
- System.IdentityModel.Tokens.Jwt
- Thinktecture.IdentityModel.Core
I am going to refer you again to Taiseer’s blog post for an explanation of what each of them does or you can read the description in NuGet
One important point here, pay extra attention to Microsoft.Owin.Host.SystemWeb, this one is responsible for initializing the server so it scans for the Startup class. If you don’t have it, nothing is going to work and it can be the source of many issues to find out why things don’t work as they should. For a deployed server, make sure you have that dll in your bin folder. You don’t need any owin appSetting or any tags on the StartUp class to make it discoverable.
Once you have all the packages it’s time to write some code. We need to create a few classes : CustomJwtFormat, CustomOAuthProvider, Startup.
You can look at the code in github as well to speed things up.
When you first request a token from AS you will hit the CustomOAuthProvider, this is where we check that the Audience and Client Secret actually match an existing Audience and fire some errors if they don’t. Once everything is validated we will then hit the CustomJwtFormat class. This is where we generate the Jwt.
We are now at the point where we can actually see the AS working.
So I would advise you to create a proper IIS website pointing to AS. You can have it locally for now, give it a nice URL, add that URL to your hosts file pointing to localhost and run it.
During this article we will use the Postman client to work with our restful APIs. Postman is a Chrome extension and is fairly nice to setup and you can even build your own collections and calls for later use.
Ok so, first things first, let’s setup AS in IIS.


In the first image you can see the site setup in IIS, nothing fancy there, we just point to where our files are.
The second image show the site bindings.
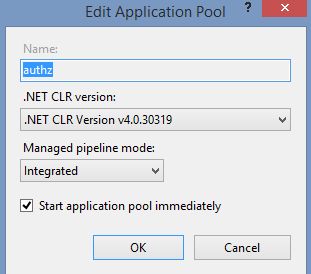
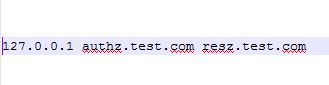
The third image shows the app pool for this site and finally the entry used in the hosts file to make that nice URL work locally. Quick reminder, the hosts file can be found typically at this location : C:\Windows\System32\drivers\etc\hosts
Don’t forget to edit the web.config and place your own settings there. Once you’ve done this you’re ready to test and see if you can get a Jwt.
Let’s fire Postman, put your token URL in there first. In my case it will be http://authz.test.com/oauth2/token
This call needs to be a POST so change that in the dropdown.
Next we need to add an Authorization Header the way it’s described in the CustomOAuthProvider class
Take the ClientId and Client Secret, concatenate them with a ‘:’ in between them, Base64 encode them and add the result to the Basic header. To make this clearer I found a nice website where we can do all this in a visual way. Go to https://www.base64decode.org/, select Encode, select the Ascii charset, type your clientId:clientSecret and hit Encode. It will look like this:

There is an easier option as well, in Postman select Basic Auth at the top, fill in the username field with your ClientId, the password field with the Client Secret, then click Refresh Header and this will generate the correct header for you.
Now that we have the Basic Header, let’s continue.
Select x-www-form-urlencoded and then add:
grant_type – password
At this point we’re all setup so fire the call and you should get something like this:
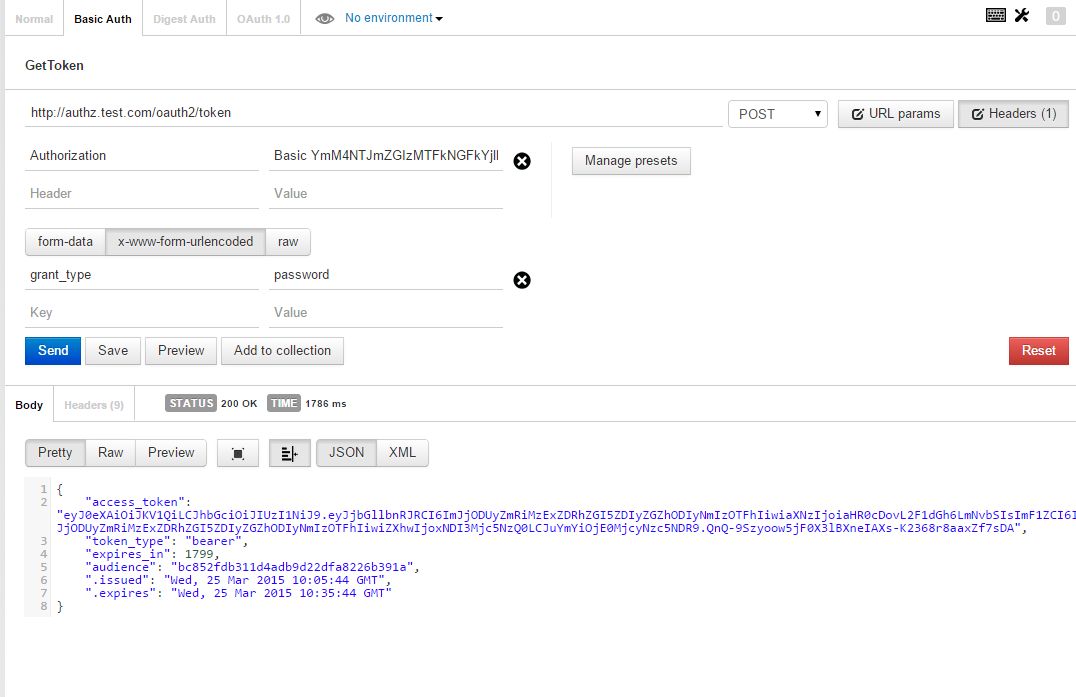
We got back a Json object, notice the access_token and also notice we have a few useful properties such as expires_in. This one tells us how many seconds the token is valid for, so we could store it somewhere and reuse it until it expires. We control this value in web.config so you can play with various numbers there.
2. The Resource Server ( RS )
Description
RS will offer all the functionality we need for a membership system. It will allow us to create and update user information, roles, change passwords, reset passwords, all the functionality you need to be able to say you have a membership system.
Creating the membership database is a straight process. Asp.Net offers us the tools we need to do just that. Launch C:\Windows\Microsoft.NET\Framework\v4.0.30319\aspnet_regsql.exe. Obviously check your framework version, that’s just my current version at this point in time. This exe will launch a GUI which will allow you to connect to a database and it will create all the tables and stored procedures required for the membership system to work.
Next, create another empty web project, exactly as we did for AS.
We need to add a number of NuGet packages:
- Dapper
- Microsoft.AspNet.Cors
- Microsoft.AspNet.WebApi
- Microsoft.AspNet.WebApi.Client
- Microsoft.AspNet.WebApi.Core
- Microsoft.AspNet.WebApi.Owin
- Microsoft.AspNet.WebApi.Tracing
- Microsoft.AspNet.WebApi.WebHost
- Microsoft.Owin
- Microsoft.Owin.Cors
- Microsoft.Owin.Host.SystemWeb
- Microsoft.Owin.Security
- Microsoft.Owin.Security.Jwt
- Microsoft.Owin.Security.OAuth
- Newtonsoft.Json
- Owin
- System.IdentityModel.Tokens.Jwt
The RS code is available on github as well so have a look at the classes and controller(s) there.
You’ll notice that each calls clearly identifies its own route and there’s a route prefix at the top of each controller. Each call validates its input model and returns a HttpResponseMessage containing the proper code and an result object where appropriate. Notice the [Authorize] attribute at the top of the controller. This attribute makes sure that no one is allowed to hit any of the controller methods without a proper Jwt. If you remove it you can freely fire calls to the RS without any authentication.
The important part happens in the Startup class.
Look at the ConfigureOAuth call. It fires a call to get a list of all the audiences in our system and then it adds them all to a list of AllowedAudiences. These are the only ones allowed to access the RS.
At this point we should be able to fire calls to the RS and see what happens. Notice we only added a few endpoints in our RoleController so we will play with those a little and see how they work. I have also added a couple endpoints in a UserController, so we can create a user and then validate it. It wouldn’t be much of a membership system without this basic functionality.
In order to be able to fire calls to RS we need to add a Bearer Authorization Header with the access token generated by AS.
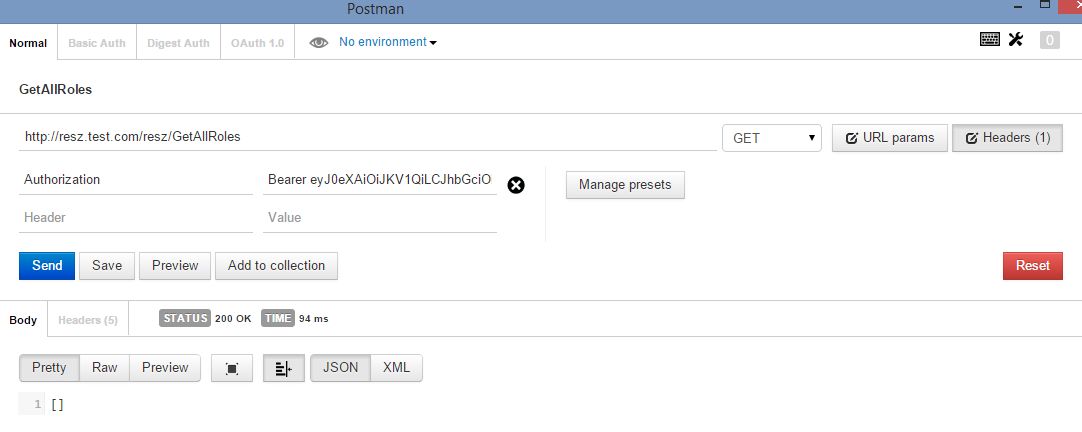
The call succeeds, it returns an empty list since we haven’t actually created any roles yet.
Now try to remove the last character from your token thus invalidating it, or even simply remove the Authorization Header completely.

Unsurprisingly, we get an authorization error. So everything we did up to this point worked.
Let’s try something a little more complicated now, let’s say we want to create a role.
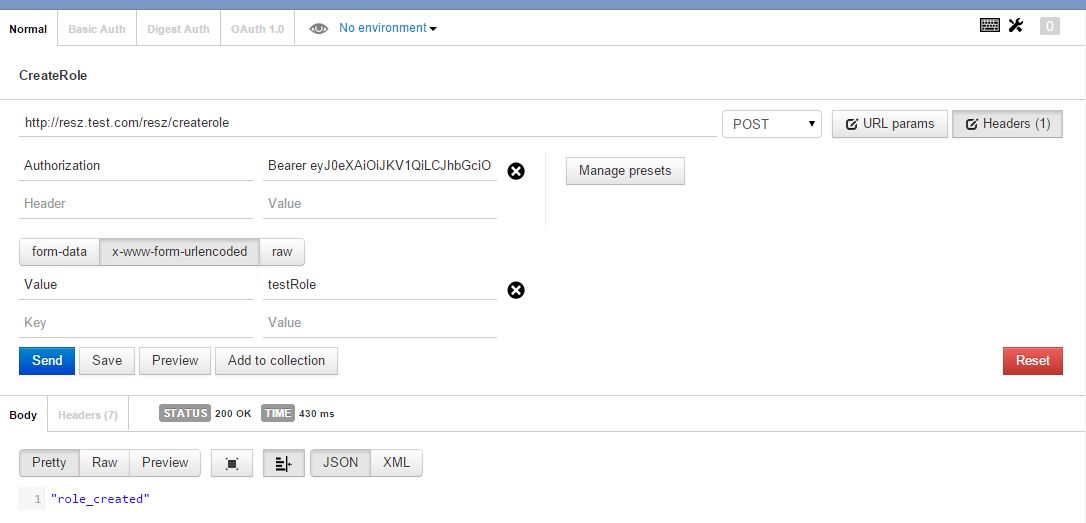
Everything looks fine, the role was created, to prove this fire the same call again, with the same Value. We should get a duplicate role error now :

Fell free to run the GetRoles now and you should see your one role returned.
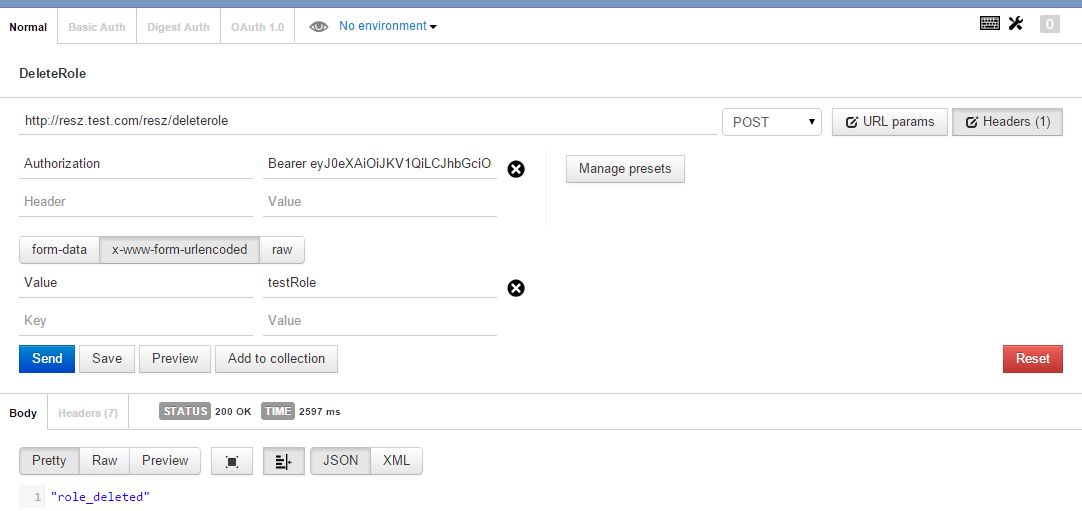
Next let’s delete this role we’ve just created :
Hopefully this provides enough information for you to be able to continue and write other calls yourself.
Postman tip
Notice we can create collections and add a number of calls to them so we could end up with a list we could just click and go and only having to change the bearer token.
Now, wouldn’t it be extremely nice if we could create our projects as NuGet packages and deploy them at a click of a button ?
4. NuGet packages setup
This is where the real fun begins. What do we need to do to create and deploy NuGet packages ?
There are a few steps we must go through.
First we want each project to create it’s own NuGet package and copy it to a specific folder ready for upload to the NuGet feed.
For that to happen to must first setup the NuGet feed itself. This is actually very easy, have a look at the PrivateNugetFeed project. It is a simple web project with the NuGet server and NuGet core packages. The important bit is that it has a packages folder where we need to copy all the packages we build. Once that’s done we need to deploy it somewhere. I went with an azure feed myself so I can publish quickly.
So, let’s see how do we build the packages. You will need to get nuget.exe which you can grab from the NuGet ‘s main site.
At this point the folder structure is very important so have a look to see how the solution is laid out. There is a Tools folder where the nuget.exe is placed, this is so that if you work on a team, everyone has everything they need the moment they clone the code, rather than installing their own dependencies.
With that in mind let’s open the properties of AS. Under Build events we want to create the package only on a successful build.
We need these lines :
start /wait $(SolutionDir)Tools\Nuget\nuget.exe pack $(ProjectPath) -Symbols
copy $(TargetDir)*.nupkg $(SolutionDir)Code\PrivateNuGetFeed\Packages
Then first one will create two packages, one of the main dll and another containing the pdb so we can actually debug in a target project.
The second line will copy the packages to the Packages folder of the NuGet web project, ready for deployment.
The start /wait means that the second command will not run until the first one finishes.
You will notice these two lines on the RS project as well.
The last thing we need to setup is the nuspec file.
To create one all we have to do is open a command line prompt, navigate to the folder of the project in which we want to create it and type nuget.exe spec. This will create a nuspec file with default values we need to edit.
Let’s look at the one we have in the AS folder:

Everything you see between $ signs comes from Properties/AssemblyInfo.cs in the same project:
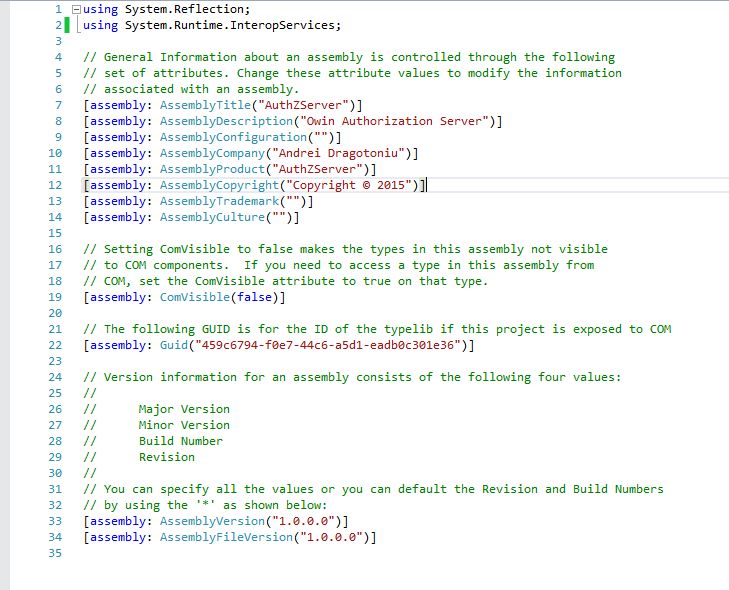
The assembly version is very important, it will become part of the NuGet package file name and will be visible on your feed as well. So let’s say you want to update such a package, you simply increase the version to say 1.0.3.0, deploy it and then when you check under Updates in NuGet you will see it appear there.
Let’s get back to the nuspec file next. We need to tell it which dependencies to load so check out the dependencies xml tag and you will see the packages we want installed when our package gets installed somewhere. This will ensure that everything will build from the get go.
Under files we add all the files we want deployed as they are in the target project. In our case we want the web.config file and all the pdbs which will come from our symbols package.
The Web.config is an important part. It will need a transformation file as well, simply create a normal text file and then rename it the way I did.
One last thing, every file under the files xml tag will be copied inside the NuGet package in the location you specify. In our case Web.config goes inside the package, inside a Content folder and everything in that folder gets added to the target project which is exactly what we want.
At this point we’re ready to create our feed, so let’s do it step by step
1. build all the projects in the solution, this will copy all the NuGet files to the Packages folder of the publishing project.
2. These nupkg files need to be included into our solution otherwise they will not get deployed when we publish the Nuget server site, so make sure you don’t forget this step.
2. In the target solution where you will install these packages, you will need to tell NuGet about your private feed, so right click on the solution name and allow it to restore all the packages on build. This creates a .NuGet folder right at the top. Open up the NuGet.targets in there and add another package source with your own private feed URL.
Ok, the moment of truth has arrived. Can we create empty projects, install the packages we just created, change the web.configs with our own values and have a running AS and RS ?
Let’s test this bold expectation!
Create an empty solution, in it we will need two web projects, one for AS and one for RS.
Create the empty AS web project first.
Right click, manage nuget packages, select your own private feed then click on the Authorization Server package:
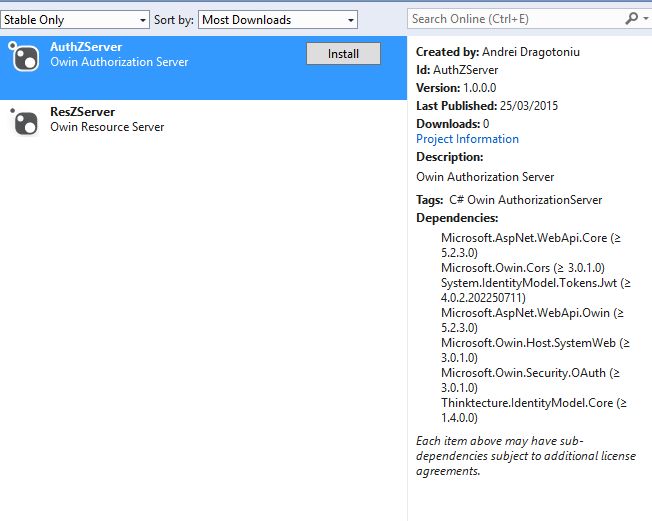
Notice how we can see the version and the dependencies, exactly as expected. Now click Install, wait a few seconds and then your project should include all the references it needs. Don’t forget to edit web.config and do the setup work with the new api URLs and databases. You don’t need anything in this project, it won’t have any classes, will just be an empty project with the references to all your dlls which is where the magic happens. Now, isn’t this nice ?
Repeat this procedure for RS. You’ll and up with two projects with no code files!
Remember to fill in your own details in the web.config of each application then use postman again to test the AS and RS just like we did before. Everything should work exactly the same way.
You’ve just setup an entire owin authentication system in a few clicks of a mouse!
If you check Github, you’ll notice I also added an ApiUse console app. Its only purpose is to show how we can use the APIs. The code is very simple and uses WebClient, firing a call to AS first to get an authorization token and then it uses it to fire a call to RS to get a list of roles. It’s just an example of how you would use these APIs in a real project.

One final thought, always make sure you secure your APIs with https so that every information exchanged is protected. It will protect your authorization header and all the post data.
I am interested to hear what you think, is there anything that could be done better or maybe we need more functionality added.

Stepping through the first example with Postman and I’m getting
“error”: “unsupported_grant_type”.
This is the request:
GET /oauth2/token HTTP/1.1
Host: localhost:56283
Content-Type: application/x-www-form-urlencoded
Authorization: Basic amltOnNlY3JldA==
Cache-Control: no-cache
Postman-Token: 8a11fe49-5f59-9433-ba25-42ab9ab0a9f7
it sounds like you’re missing the grant_type = password in your request.
There’s a github repo for this, showing how to issue the call with the correct parameters. Hope it helps
Hi I was wondering if you had considered a refresh token scenario or are you operating on the assumption if the token expires just redirect? I was wondering how you’d combine something like this with facebook and google auth as well to allow multiple auth options in both a web and mobile app scenario
You can definitely implement refresh token if you need that. It is supported i just didn’t have a need to actually do it.
The place to do it is Startup class where the OAuthOptions are created.
At that point you can specify the RefreshToken provider. You will then need to implement this refresh token provider. The idea is that the access token is short lived, while the refresh token is long lived. The code is pretty much trivial for this part.
As far as I know, Facebook uses OAuth2, I am not sure about Google’s one as I’ve never used it.
I wrote my own OAuth2 library, since it’s not really that hard. All it needs is the token URL, ClientID, ClientSecret, ResourceURL and RefreshToken Url if you have implemented that part.
I might be able to create a repo with my version of the OAuth2 lib but I am not sure it would help you much. It’s based on the HTTPRequest object which is not available as a PCL. If you need to implement something which you can use with mobile clients then you will need something else, such as the HttpClient I am using for my tests for example. I have an article which shows how to code something like that from a Xamarin app, if you think it might be of help.
Hopefully this provides enough details to get you started. Let me know if you have any questions and thank you for your interest in this article!
I still do not get how to setup the Json web token? I am only interested the json web token.
thanks
Jeff
Hi jeff,
look at the CustomJWTFormat.cs class. Inside the Protect method, that#s where the JWT token is created :
var token = new JwtSecurityToken(_issuer, audienceId, data.Identity.Claims, issued.Value.UtcDateTime, expires.Value.UtcDateTime, signingKey);
Hi, excellent post. i have a question… why do you use two servers?
Greetings from Panama 😀
you don’t have to and I actually used both approaches, 2 servers and also just one. It makes sense to use two if you want to not put too much pressure on any. One server generates tokens, one server uses them. It’s totally fine however to do all the work on one server.
Thanks, bro. Blessings.
Best tutorial on the web. I’ve been working/learning for weeks about Owin/JWT and this is the best resource i’ve found. Tnx a lot man!
Thanks a lot, I appreciate the nice words. Glad it helped 🙂