
This article continues the work done in a previous article : Authorization system with Owin, Web Api, Json Web Tokens.
We saw how to build an Authorization system based on Owin, Web Api and Json tokens. Next we want to see how we can put this system to good use from a Xamarin app.
I plan to write an article for each platform and this one happens to be the iOS one.
Please note, this article assumes you already have Xamarin installed, working and hooked up to your Mac Build Host. If you need help with any of these topics then please check out the official documentation which can be found here.
This article also assumes you have read the previous article so it won’t explain terms and concepts used there. I encourage you to start there first.
To recap, we already have two restful APIs : an Authorization Server ( AS ) and a Resource Server ( RS ) built in the previous article.
We will send a request to AS, passing through our ClientID and ClientSecret and if everything is correct we will get back a Json token which we can then use to send calls to RS.
We will use the Microsoft HTTP Client Libraries NuGet package for our HTTP calls. In fact, we will write a ServiceWrapper PCL library because of course, we want to reuse this code for each our platforms.
At this point in time, the current Xamarin version is 3.9.547. I always stay on the stable channel, because it should be the most tested and stable and that’s what I am after!
The code is available on Github and you’re free to play with it as much as you’d like.
We’re going to start with an IServiceWrapper interface because we are responsible coders and we may want to change some things at some point and we know it’s never a good idea to hard code ourselves into a corner, right ? 🙂
This interface is very simple, we will only have enough calls to show how to use the authorization system :

As you can see we only have three calls, one to receive the JSon token, one to register a user and finally a call to validate a user. I think this is enough to show how to get going and I encourage you to write a few methods of your own just to get a good grip on how this system performs.
Next, let’s write an implementation of each method in the interface, using the NuGet package mentioned above.
Let’s start with GetAuthorizationTokenData :

We create the FormUrlEncodedContent, this is where the grant_type goes. Then we add the Basic Authorization Header and then fire an async post call to the Authorization Server which in my case is happily running on Azure. Please remember that my APIs are not guaranteed to be up 24/7 and may actually be taken offline completely at some point. For now however you’re welcome to use them, just don’t abuse them! Using the previous article you can easily write your own APIs and deploy somewhere under your control.
Let’s take a look at the ValidateUser method :
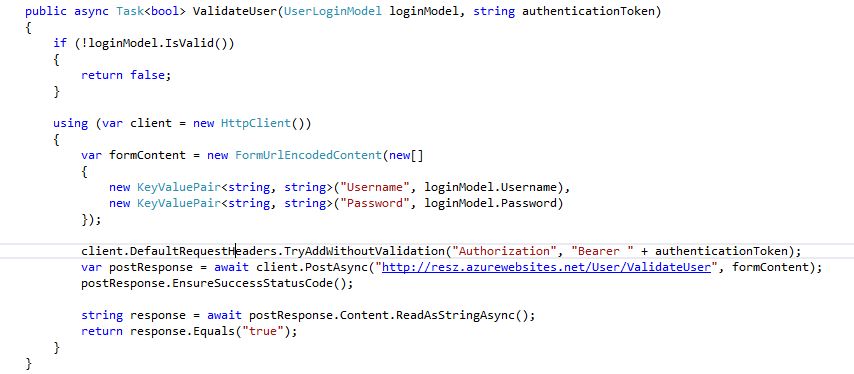
This one needs to send the username and password using a Bearer Authentication header this time. Other than that the code stays pretty much the same, there is literally nothing fancy there.
Finally the RegisterUser method :

Same as before, we simply build our post model, fire the post call and return the result.
Now that we have our service wrapper in place let’s see how we use it in the iOS app.
In order to build the UI I used the storyboards system because I kinda like it and it makes sense to me.
My Storyboard looks like this :

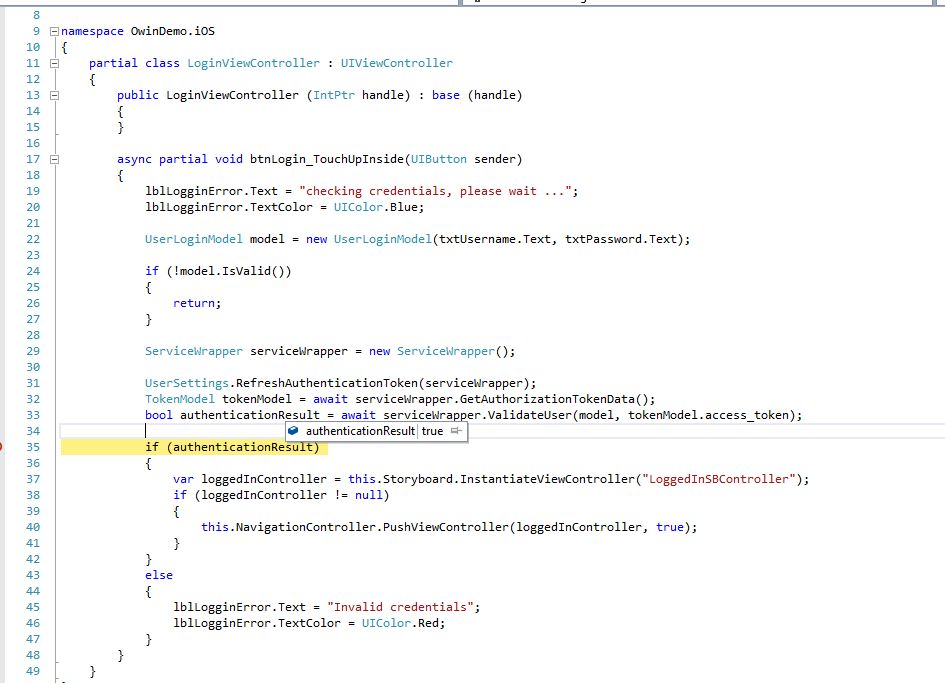
Just to give you a basic idea how I built this UI, I started with a new storyboard and removed the default controller it created for me. I then added a navigation controller so I get some basic navigation between my screens. I hooked up the Login screen using a Segue, this is done by holding CTRL key and dragging from the Navigation Controller to the Login screen. The rest of the navigation happens when you click on the buttons. For example to navigate from one view to another, all you have to do is push a new ViewController onto your navigation controller. The code looks like this :
var loggedInController = this.Storyboard.InstantiateViewController(“LoggedInSBController”);
if (loggedInController != null)
{
this.NavigationController.PushViewController(loggedInController, true);
}
One tip here, I had issues instantiating a new view controller based on the name, in this case LoggedInSBController. What I ended up having to do was to go into the xml of the storyboard and add a storyBoardIdentifier with the name I wanted.
![]()
This seems to be a bug in Xamarin, I am sure they’ll get to fixing it, but for now, always keep this in mind. Unfortunately this attribute will reset every time you save the storyboard so you’ll have to go back in and add it manually again.
The UI in general is very simple, I have a few very basic screens, a login, a registration and a welcome screen.
Let’s run the application and see what happens :
First the login screen loads :

Click on the register button, this takes us to the registration screen :

I used user demo and password demo1234, then clicked the Register button. This populated the blue text above “contacting API, please wait …”. I had a debugger set on the register controller so I could see this working :

The call worked :

At this point I can navigate back to the login screen, use these details and try to login :

The result, in debugger looks like this :
Finally I get to see the Welcome page :

As you can see this app is very simple and it could do with some design love. Let’s not forget the purpose though which was to show how we can use the Authorization API and what we did so far worked perfectly. There’s a lot more we can do in terms of interface and functionality but this will do for now.
In future articles we will look at Android, Windows Phone and finally a Xamarin Forms app.

Pingback: Adam J Wolf: Weekly Xamarin Newsletter Issue #37 | XamGeek.com
How about Droid version Sir ? I’m trying to login a website on Xamarin Android, but method PostAsync(url, formContent) hang for about 20 seconds then fire bugs
hello and thank you for checking out this article.
I am aiming to have a working android app by the end of this week. Watch this space!
ok, better later than never – here is a new article showing the rest calls working on a real android device. Hope this helps, let me know if you have any questions.
Pingback: Xamarin – Rest Services PCL | Andrei's web corner
This is awesome! How do I store the token and retrieve it form the device?
Hi Manny, thank you, I am glad you found it useful!
There are a few ways to store such data, it could a SqlLite database, or for example as described in this article : https://forums.xamarin.com/discussion/8199/how-to-save-user-settings
Please note that the token has a limited life span so you will definitely want to store that as well. Just reuse the token while valid and request another one when it expires.
Hi! Thanks so much for taking the time to write such clear posts on jwt and auth I’m so glad I found this..
I was wondering how you’d envisage handling a scenario where you need to do manual registrations and generate jwt tokens AND do somerhing like oauth for facebook and google etc so those users were registered for use with the resource server?
Thanks
Tom